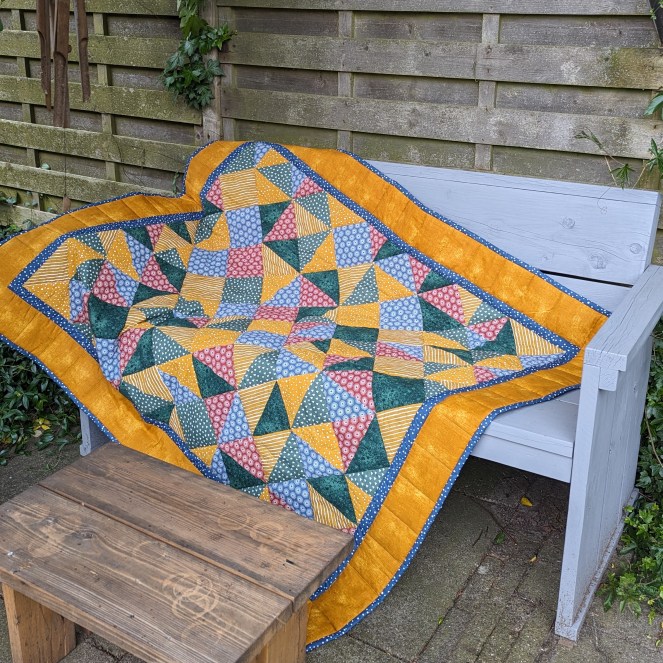
About 2 years ago I gifted one of my sisters a coupon for a quilt, made to her own preferences. The process of actually getting to sewing it was a slow one (picking colours, buying fabric, designing the pattern…) but last spring I got around putting all the pieces together, and the quilt above is the result!
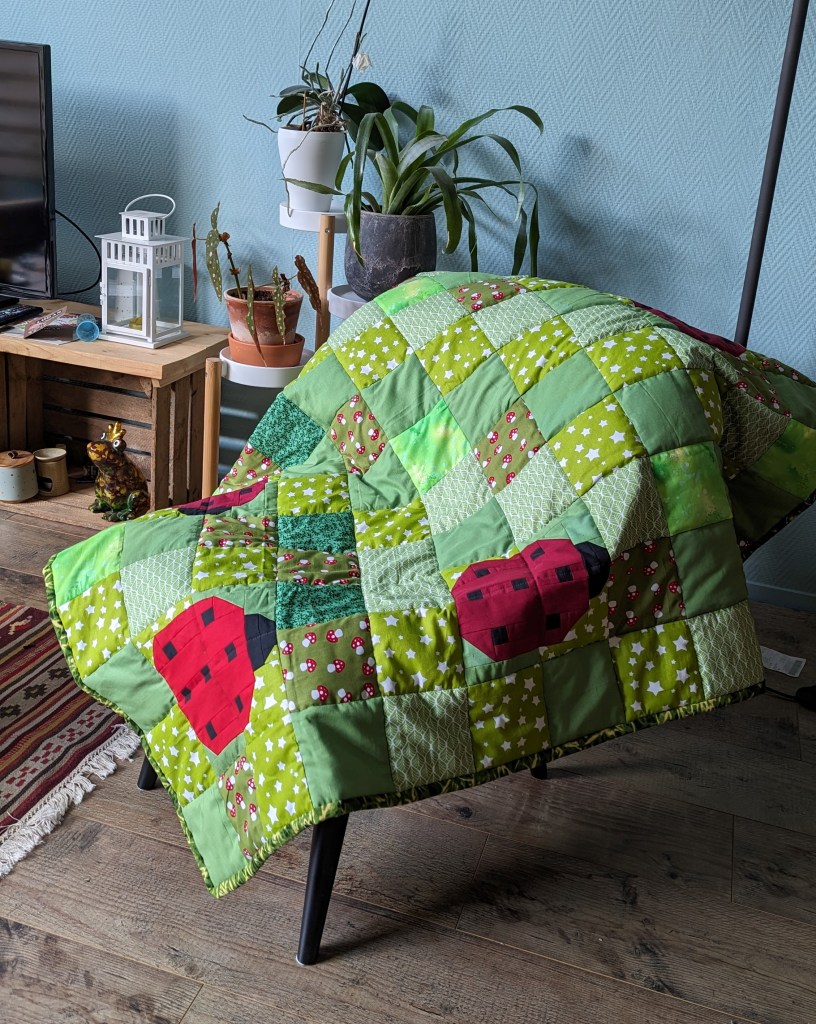
Every now and then I like to make a quilt, and I try to sew one for all friends who become parents for the first time. If possible, I like to connect the theme of the quilt to what they like, or something with a story attached to it. This particular quilt was made for two of my best friends and their baby, and when they told me they were expecting I immediately knew it had to be a ladybug themed blanket. I will not go into the full story here as it is not mine to share, but it was equally nerdy and endearing.
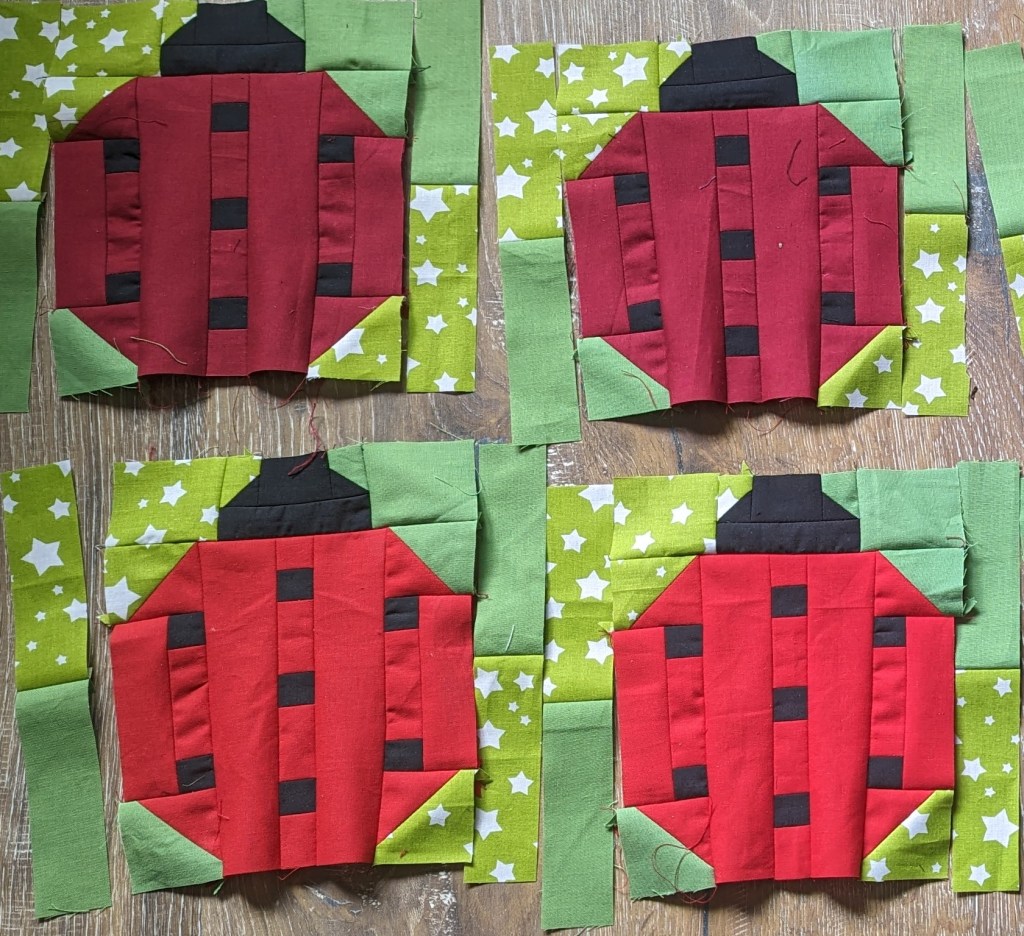
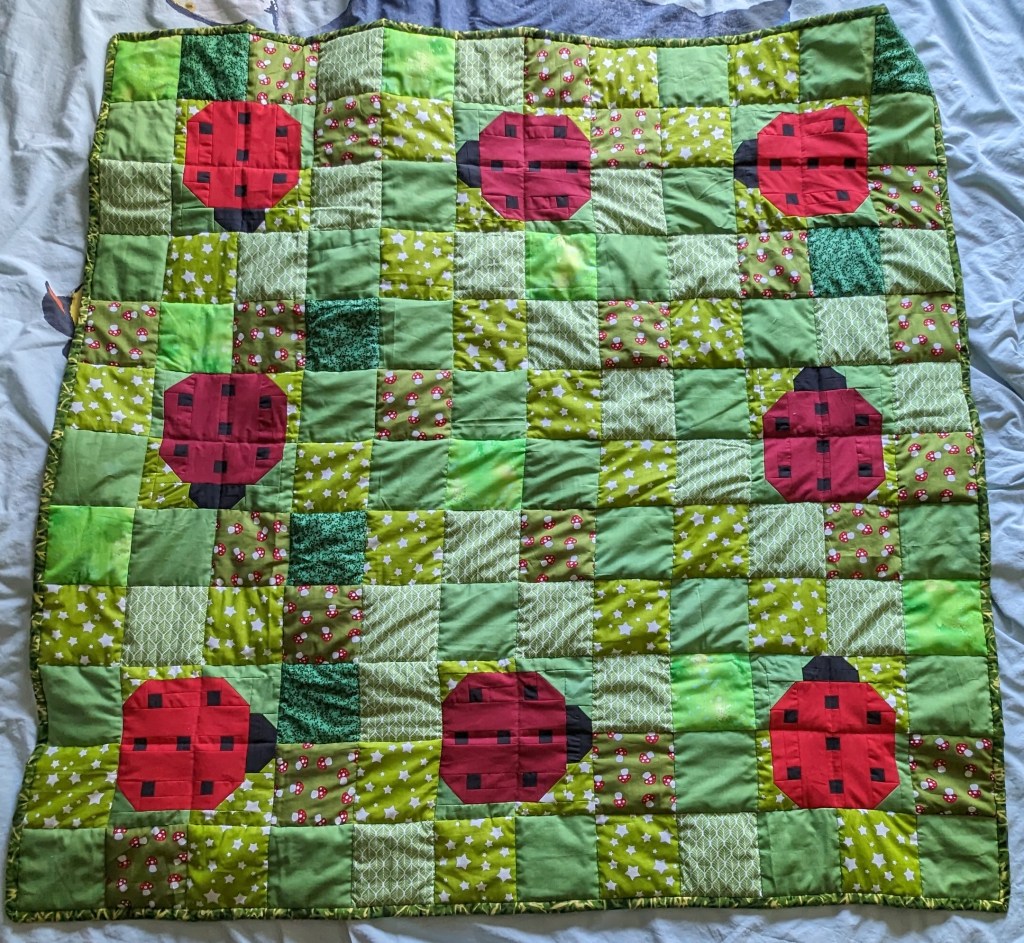
I started the idea of the quilt while my friend was still pregnant, but in between moving house, starting a new life in a new city and a head that could just for the moment not deal with designing a quilt block with a ladybug in it, the quilt was not finished before the baby was born, but I set myself the goal to finish it before their first birthday. To make my life a little easier, I reverse engineered the ladybug blocks from a patchwork block I found on the internet, and therefore I will not share a full tutorial on it. I made 8 of them, and they look like this:
I made four lighter and four darker ones, because that is what I still had in my stash, and used all kinds of green scraps for the background blocks. Once I figured out how to do the blocks and the rest, the quilt came together quite fast. The ladybug blocks have a lot of seams, and therefore were not completely flat, which caused the rest of the quilt top to also deform a little. I decided not to worry about it too much, because the batting in the quilt probably could correct for that later on (it did for the most part). To be honest, I really like quilting, but I will not fuss endlessly over things not being completely flat or not lining up perfectly. As long as it’s half decent looking, I am happy.
For the backside I found a fabric with a photographic grassy print, which I thought was very appropriate for the quilt. I used a polyester batting and quilted the blanket on the stitch lines between the blocks. The edge was made in the same fabric as the back. I think it turned out pretty good, and I hope the almost-todler by now will enjoy it for many years to come!
A few weeks back I reignited my sewing journey with the first make 9 of 2023. That’s right, I plan to have more make 9-like sewing lists! To be honest, I don’t expect to complete all the lists and sew all the things, but setting goal is a useful way for me to plan my year and have a idea of where to start. I seem to suffer from a weird kind of paralysis if I don’t have a plan, so just making a list helps me enormously!
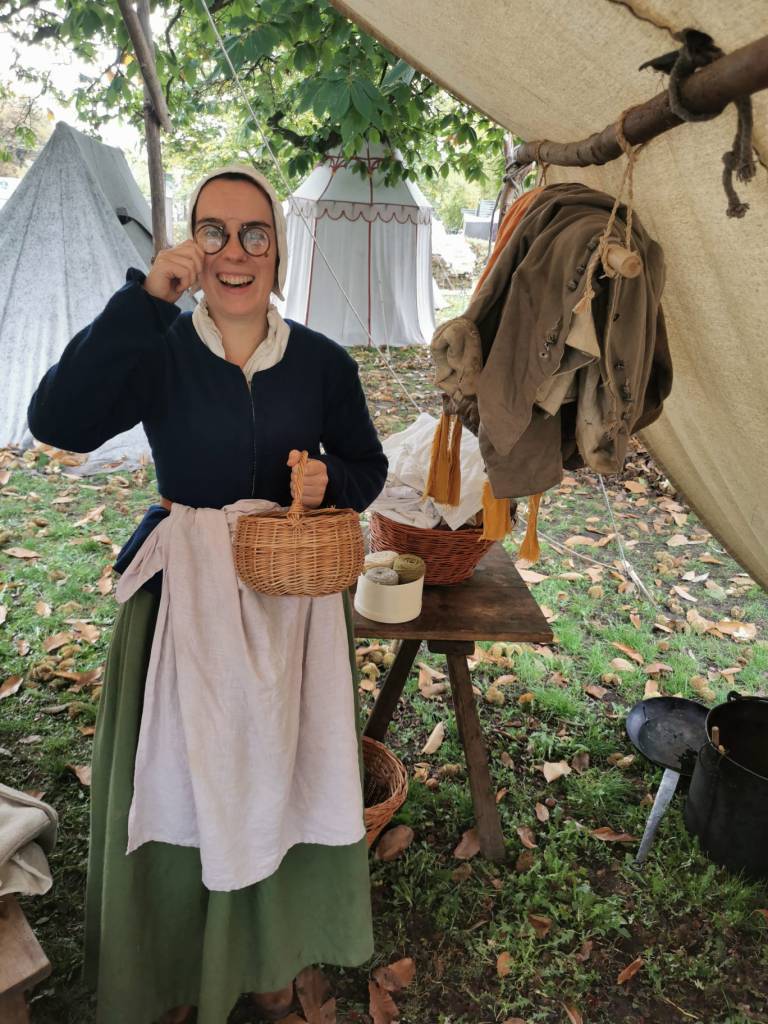
Now on to the title of this post.. 17th century you say, what is this? Well, it’s a part of me that I didn’t write about yet on his blog, but since it consumes a lot of my hobby time, and requires a lot of my sewing skills, I figured I just might as well. One of my most important hobbies for the past 10 years has been reenactment. For the reader unfamiliar with this term: it means to portray a certain place and time in history as accurate as possible, and often it’s focussed on military history. In that regard it is quite different from LARP (playing a fantasy game often set in a historically inspired setting) or the SCA as it is know in the US (selectively recreating pre-17th century european cultural elements). It’s interesting, lots of fun and sometimes it looks silly too, as demonstrated in the picture below.
Hello?
I myself am not very interested in military history, but since history is full of civilians, there is much to choose from! I am a member of a military-oriented group called Compagnie te Voet (Company afoot), which portrays a pikemen division from the Dutch army in the period 1600-1630. This army was usually followed by a large group of civilians or camp followers (similar to the German tross), offering their goods and services to the travelling army. In the past few years our group started to put more energy into this part of the army camp, and we now have a pub, a stall with baked goods, a stall with hot foods, someone selling clay pipes and tobacco, and more on the way. My plan for this year is to start a small sewing and repair business. War is hard on the clothes, and not an event goes by without a burst seam, a sock with multiple holes or a request for a needle and thread to make a quick repair here and there. I am going to look more into detail on how those things were done in an army camp, and will base my research on information on tailors and seamstresses of the time for now.
So what are my goals for this year? Completely in style with my previous post, I made a ‘make 9’ layout. Coming up with 9 projects to work on was easy, but since I know they will take a lot of time, I am pretty sure I will not finish all of them (and that’s ok).
A huik: nothing says Dutch 17th century more than a huik. In this image (“The Fish market”, 1627 by Jacob Gerritsz Cuyp (1594-1652) it is worn by both the lady in the foreground and the lady in the background. This long black cloak-like piece of clothing is very comfortable to wear in colder or wet weather. If you pay attention to them, you see huiken turning up in so many paintings from the time, and you can see why I would need one.
My sewing kit: all the essential tools for tailor and seamstress activities. These were two very distinct jobs in the 17th century, but since I would like to practice both, I will need the tools for both. This requires some in depth research, but I guess one also discovers by doing what is missing. This image is “De kleermakerswerkplaats”, 1621 by Quiringh van Brekelendam (~1622-1669)
A doublet or wambuis: A quintessential part of 17th century men’s wear is the doublet, or ‘wambuis’ in Dutch. About 8 years back I sewed one for my then-boyfriend, and although the fit and looks were fine, I would change many things if I had to do it again. All I had back then was a pattern and my own insights, but I didn’t so much research on construction. I would like to draw a pattern and sew a doublet from scratch again, and see and feel the difference. Image: “Doublet and Breeches, 1625-1635 (made), V&A museum London, Accession number T29&A-1938.
A new or updated dress: As with the wambuis, my first dress was sewn 8 years ago when I still had no real idea what I was doing. I made a second dress since (the one in the photograph of me), but I’m still not completely happy. I think the fit could be improved, but my largest concern is the colour. At the time I bought this fabric, the consensus in our group was ‘all colours that could have been dyed with plants are ok’. In the past years however, by talking to experts and looking at pictures, it is clear that amost dresses are in shades of red, blue, black, and natural tones. My green and yellow dress if definitely not a very common choice, and therefore an update might be required at some point. Image: “#75 A peasant couple and a dog on tiptoe”, ~1620-1626, by Adriaen van de Venne (ca. 1587/1589 –1662), from the British Museum collection, registration number 1978,0624.42.74.
A new bonnet: same story as with the wambuis and dress… it was made 8 years ago from a pattern in the Tudor Tailor, which is a wonderful resource, but it’s English fasion from an earlier period. It kind of looks correct, but it’s not if you look closer. A Dutch bonnet was usually worn with an ‘oorijzer’ or ‘ear-iron’, which is a wire that goes from the temples over the ears and around the back of the head, to which the bonnet is attached. The image included shows the correct shape: a bonnet consisting of two parts, attached to the iron with a small pin at the temples. Image:“Catharina Hooft with her Nurse”, 1619-1620, by Frans Hals (1582/1583-1666), from the Staatliche Museen zu Berlin, Gemäldegalerie, Ident. Nr. 801G.
Underpants: yes, the unmentionables! Curiously, there is not much proof or finds of women’s underwear from this period of time that I know of. For men there are some finds, especially from earlier periods (such as the famous Lengberg castle find). Looking at the situation with my very 21st century view, I think women might have worn something, for their periods and decency. At this moment, usually I don’t wear underpants *gasp* and never experienced exposure, but I think it will be an interesting subject to research, if only to prevent a situation as seen in the image: excerpt from “Ijsvermaak”, 1610, by Hendrick Avercamp (1585-1634), from the Mauritshuis, inventarisnummer 785.
Passementerie course: This is not something to make per se, but something to learn this year. The Textile Research Centre in Leiden offers a course about 17th century passementerie this year, and I would like to participate. It will allow me to make more historically accurate clothing in the end, instead of buying passementerie that is just not it. In addition, I really like to get back into card weaving, and I am told this technique was still used in the 17th century!
Looking at the number of events we have this year, I feel very motivated to complete at least a few of those projects before the season is over. I’m already working on some of them to be honest, so updates soon!
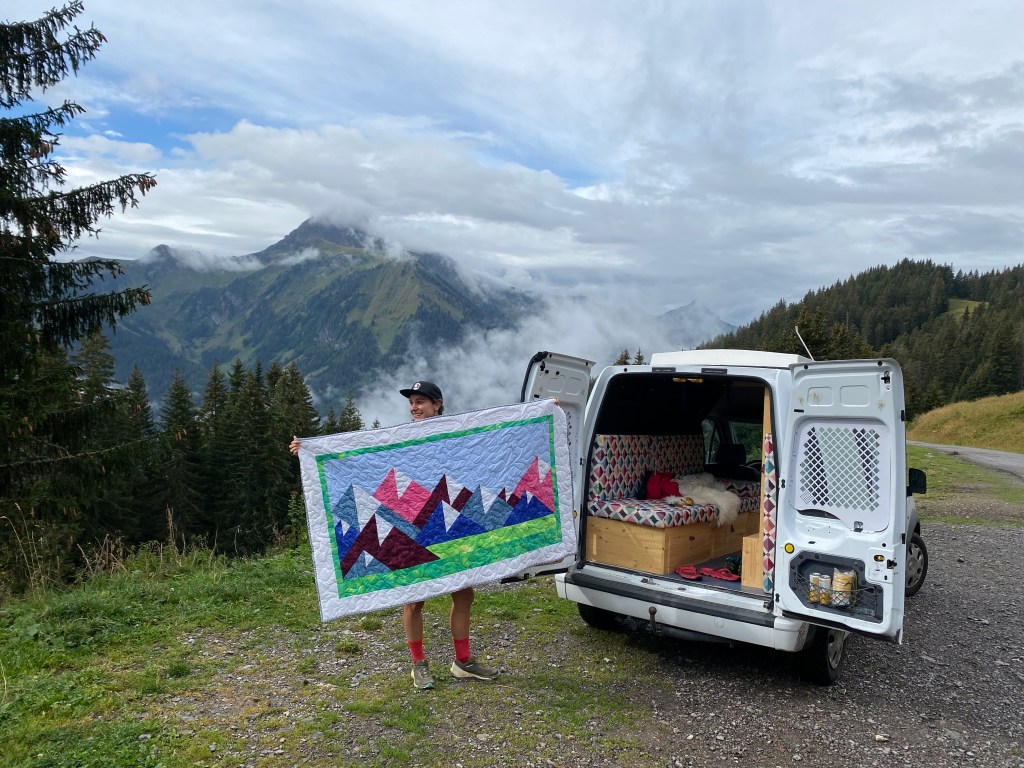
Last year my sister decided to buy a van and convert it into a small camper. She loves the mountains, and this tiny house on wheels would allow her to travel and set up camp very easily, so she and our dad worked weekend after weekend to build the interior. I wanted to give her a ‘housewarming’ gift, and decided a quilt would be suitable. Evenings in the mountains can be chilly, and who doesn’t like a cozy quilt anyway?
Because I wanted it to fit into her ideas perfectly, we made the design together. She wanted something with mountains in subdued and calm colours… We settled on a design of diagonal squares with stylized snow on the mountain tops, and a bit of grass in the foreground. Since I am not very proficient in elaborate piecing (I also don’t have the patience I think) everything is squares, triangles and rectangles. To add more visual interest I proposed to go with batik fabrics, and my sister picked the colours. That’s where the calm colours went out of the window, because Quiltshop-online has so many pretty choices. The pinks and reds represent mountains at sunset, and I liked the idea instantly.
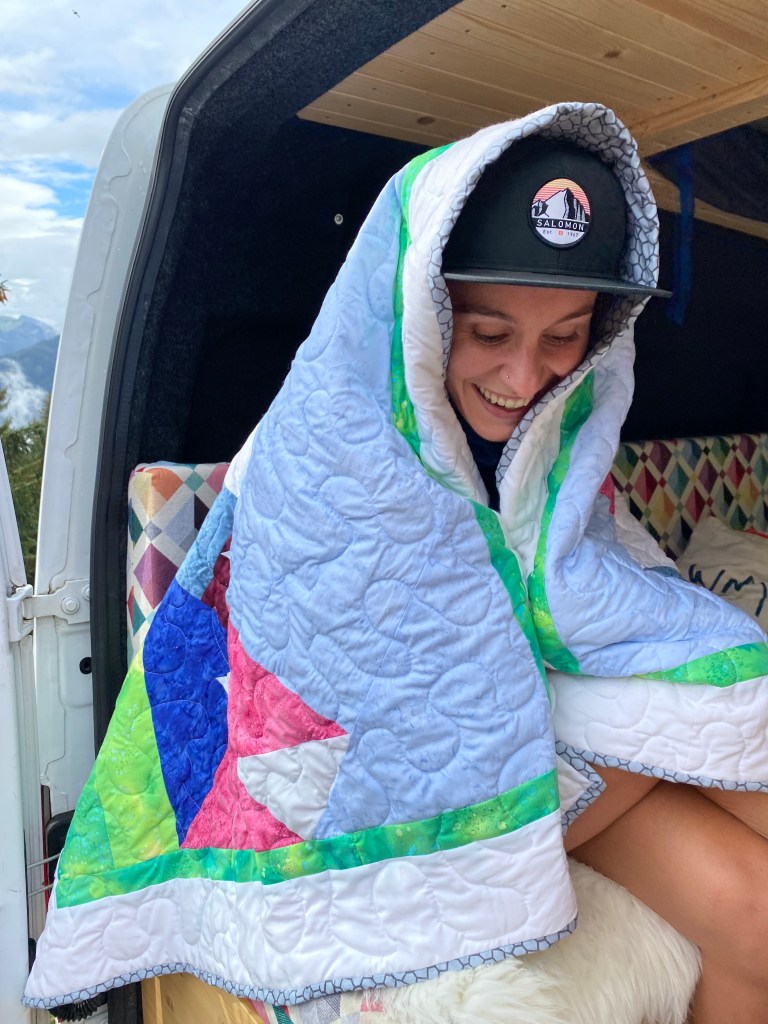
Upon arrival of the fabrics, I fiddled a bit with the design, shuffled the mountains a bit back and forth, and started cutting. I don’t have any pictures of the process, but I started in the top right corner of the center piece and worked my way to the opposite corner in diagonal rows, always trying to keep the pieces as large as possible. Then I added the green strips for the grass. I had enough dark green left to add a border around the center to “close off” this part. Without this border the front would have looked more pale, and I think this was the best decision.
The quilt was still a bit small to be a decent lap size quilt, so I added a simple white cotton border to solve this. The quilt was then batted with a cotton batting and a blue-grey back with a honeycomb-like pattern. I used a meandering freeform stitch to quilt the blanket. It looks nice, and saves the effort of perfectly stitching on the lines of your quilt. Then I used the back fabric for a narrow border, and the blanket was done!
Below are two more pictures of a happy camper and her blanket. Dear sis, I hope you enjoy your camper, trips and blanket for many more years to come!
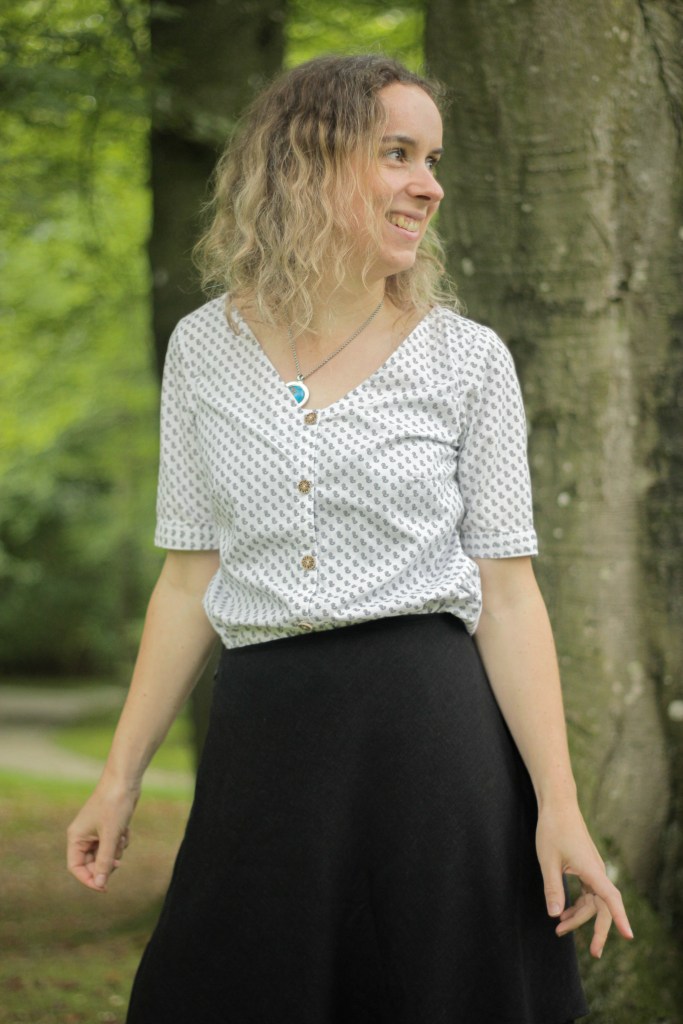
This is part two of the outfit I put together back in April, the Evely skirt by Seamwork. I had been eyeballing this skirt already for quite some time, because I thought it looked really cute. It’s simple and flattering but the two layers give a bit of interest and also the potential for nice variations. This one is just simple black, but can you imagine a lace top layer for a festive look? Or a sheer organza top layer with embroidery? Or maybe an eyelet top layer over a simple plain underlayer? I see plenty of possibilities here!
It has been a while since I posted here! Last time was in April, and so much has happened in between. The lockdown got lifted (and reinstalled partially) here in the Netherlands, social life opened up bit by bit and with that my priorities might have been not entirely with sewing all of the time… And especially not with taking pictures! The outfit I designed back in April was ready already in May I think, but has been waiting for forever to be taken out into the world. But alas, here is the first project and review of that outfit!