A few years back, I subscribed to Seamwork magazine, and this was also my first introduction to print-at-home PDF patterns. I remember putting them together correctly was not easy the first few times. Usually my pattern pieces would end up a little wavy, lines wouldn’t match up perfectly and most of all: it took a lot of time! I learned a lot over the past years and nowadays I manage to put together my PDF patterns quite fast and mostly flat. I thought I would share my technique today, so maybe it helps other people. I am going to make the Colette Myrna dress, an I will illustrate the process using this pattern.

STEP 1: DOWNLOAD AND CHECK THE FILE
Most PDF patterns come in a .zip file with multiple separate files for patterns, instructions etc. As you can see below, for the Myrna dress, the file contains contents and instructions, and patterns for the two versions in different size ranges. It also contains the pattern in wide format, which can be used to have the pattern printed at A0 size. For today, however, I will focus on the print-at-home pattern. For me that means file 4: misses, all versions (I am sure I will make this dress more often so I want to have all pieces). If you don’t know your size, check it first.
STEP 2: SELECT SIZE
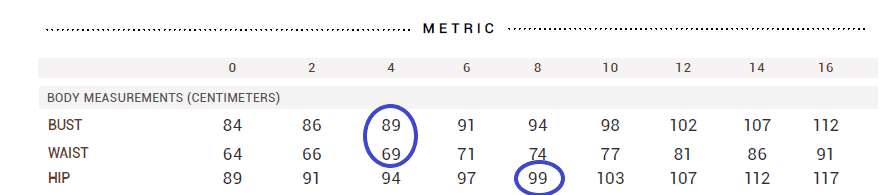
If you don’t know what your size is, start by checking out the instructions. The measurement charts can be found in the beginning of the document. Always measure over the undergarments and/or layers you intend to wear with your garment, do not pull the measuring tape super tight over your body and do not expect that your measurements fall in one size automatically. My own measurements fall between size 4 and 8 on different parts of my body!
STEP 3: USE YOUR PDF READER WISELY
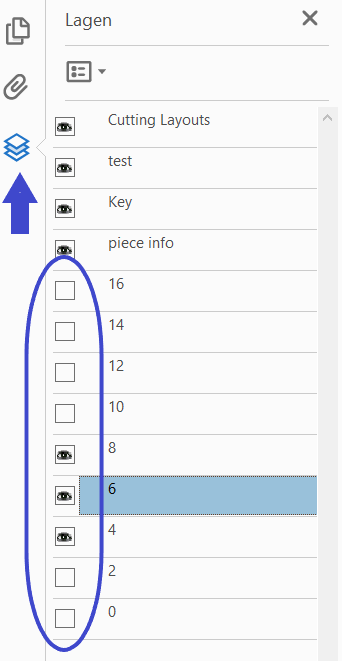
Once you downloaded and opened your pdf pattern file in a reader (I use Adobe), it is time to use the magic of layers! This is something I discovered recently and I feel quite stupid for not knowing… therefore I show it here 😉 In Adobe, there is a menu to the left, the bottom symbol will show you the layers in the file. Here, you can unclick everything you don’t need! By clicking the eye symbols in front of the sizes you are not intending to use, the will not show up on your printed file. Do not unclick everything at the top, you do want those. In the image you can see I just selected sizes 4-8.
STEP 4: PRINT!
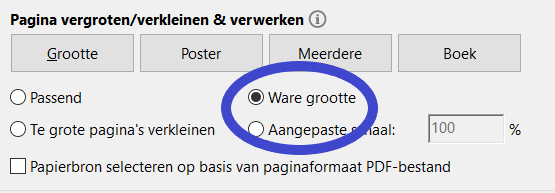
Now, you pattern is ready for printing. It is very important your pattern is the right size, so do a test print if this is the first time you print. In your printer menu, select 100% or true size. If you are not sure your printer will do it right, there is a scale box on the first page of the pattern. It is always smart to just print the first page, check the size of the test box against the indicated size and then continue with printing the other pages!
STEP 5: CUT OFF THE EDGES
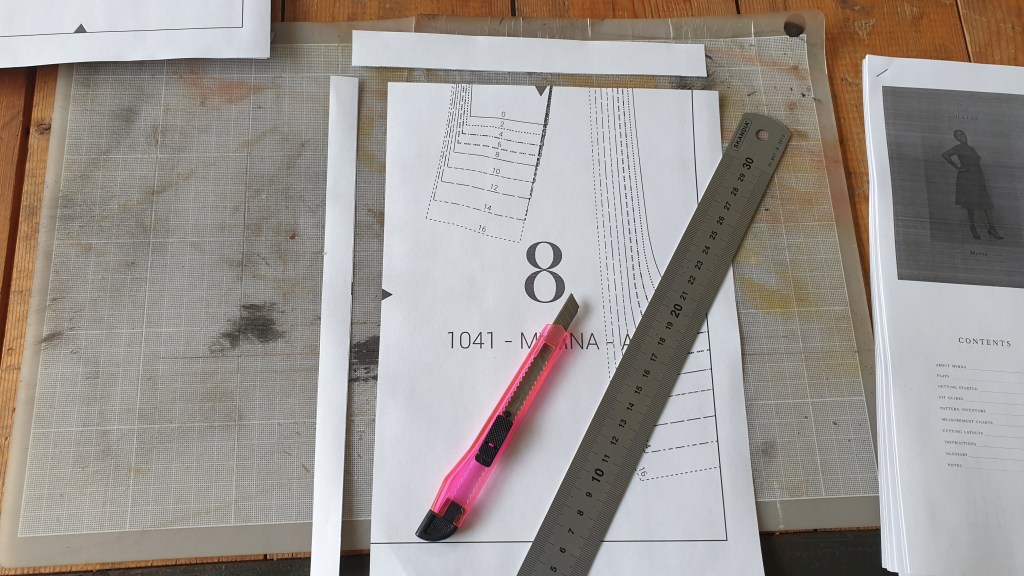
Now comes the slightly tricky part, or at least you will have to pay a little bit of attention here. You will cut off two of the edges of each piece, but you have to be very consistent here! In the image below, I cut off the left and top edges. This means that for the top row and the left column of the pattern you can omit this, but if it becomes too confusing, just cut them off, it doesn’t matter. I myself prefer to use a hobby knife and metal ruler, but some people prefer scissors or a special paper cutter. just make sure the edges are cut straight and you should be fine!
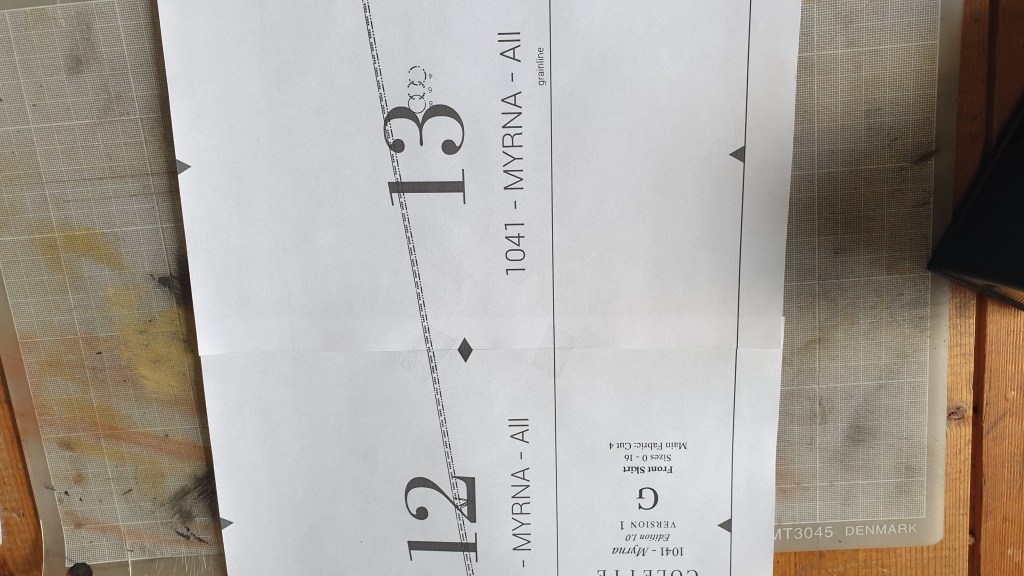
STEP 6: ALIGNING AND TAPING THE PAPER PIECES
When all your pieces have been trimmed, you can start putting the pattern together. Most PDF patterns have some kind of marks on the edges, indicating where they go together. In this pattern, it is the grey triangle on each side. Personally, I prefer to look at the lines of the pattern pieces itself. If they continue smoothly and straight, I prefer that over perfectly alligned triangles. I know by now that my printer prints a bit wonky somtimes, and this method works best for me. When the pieces are aligned, I fixate their position with a few small pieces of scotch tape, before covering the whole edge in a larger piece. When applying larger pieces of tape, make sure you don’t apply it too ‘tight’ or the paper will start to curl and wave a little. I put together all rows first, and then tape all the rows together to complete the pattern.
STEP 7: GRADING BETWEEN SIZES
As shown in step 2, I fall between different sizes, most apparent between my waist and hip measurements. This is an easy adjustment to make, as grading between sizes usually suffices (especially for dresses and skirts). As you can see in the image below, I just draw a line (pink in the image) between the waist size 4 and hips size 8 pattern lines. The hip is usually indicated by a notch on the pattern. Just make sure the line doesn’t make any weird angles, and if you are still unsure, make a muslin before you cut in your fancy fabric.

After those steps, you should have a pattern piece that is fully assembled! Depending on your preference, you can trace the pieces onto pattern paper, or just cut out the pieces directly. I have done both, and at the moment I prefer the latter. This is because I know the sizing and fit of Colette and Seamwork patterns is very good on me, and I can rely on the pieces to be correct. Would I be using a pattern brand I am unfamiliar with, I probably would opt for tracing first, so I don’t have to print and assemble a new pattern if the sizing is totally different.
I hope this post was helpful to you, and please let me know if you have any questions.
